...
A function for recording Open House / Open for Inspection (OFI) viewings is available in AgencyCloud
Multiple appointments can be created and attendees added - once added, an interest level and follow-up notes can be recorded for each attendee - all activity is logged in the property and applicant journals (or contact journal, where configured)
| Tip |
|---|
The function will be referred to as Open Houses throughout this guide |
| Expand |
|---|
title | 1. Access Open Houses screen From property record: | Info |
|---|
If open house viewings are carried out more than individual viewings, the Viewings and Keys button can be changed to directly open the Setup Open Houses screen instead - see 1a |
|
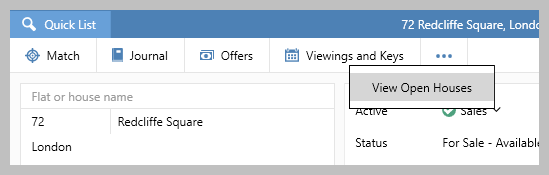 Image Removed
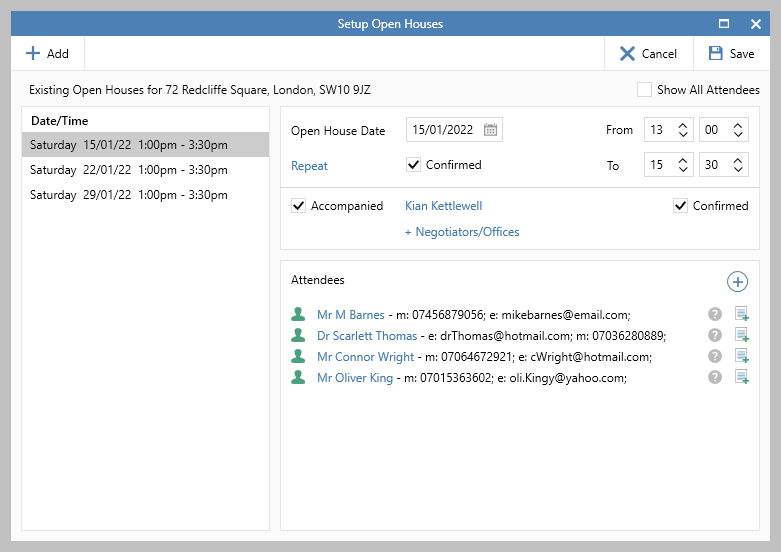 Image Removed option
 button on property screen - configuration option When open house viewings are done more frequently than individual viewings, a configuration option is available to change the Viewing and Keys button on the property screen to an Open House button To enable this configuration option, click here to contact Reapit Support When enabled: |
- option on the property screen 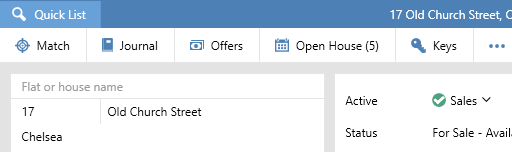 Image Removed- This screen
 |
2. Add open house appointment |
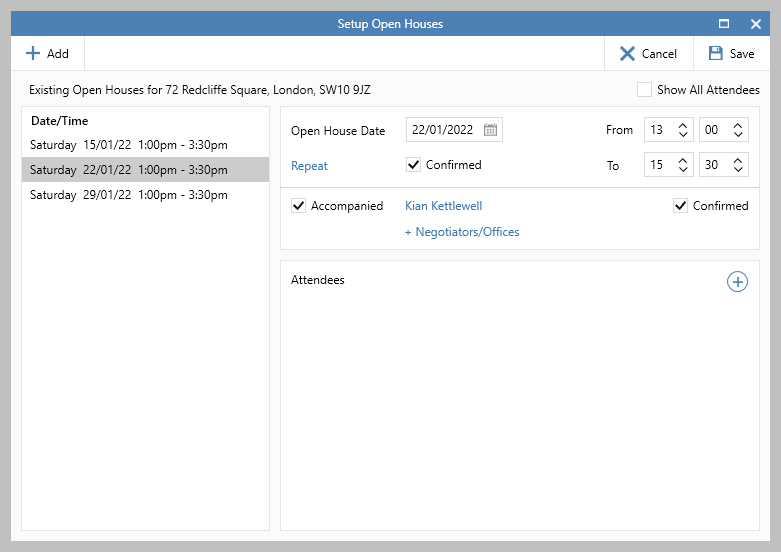 Image Removed
Click Add On main panel, enter Open House Date and From and To times for the appointment Ensure Accompanied is ticked and the name of the agent conducting the appointment is shown beside it - if other agents are due to attend, click +Negotiators/Offices and pick from the list
This will add the appointment to the relevant agent diaries Tick Confirmed when applicable Click Save
If further appointments need to be created, see next step
If not, skip to step 4
Image Added |
3. Set up repeating appointments From the screen shown in step 2: |
Found Click - click Accept
The new appointments will be shown on the left of the main screen, see step 4 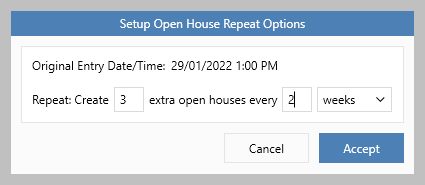 Image Added Image AddedEach appointment can be selected and changed as required
For example, to change the time or agent(s) involved
|
 Image RemovedImage Removed Image RemovedImage Removed | 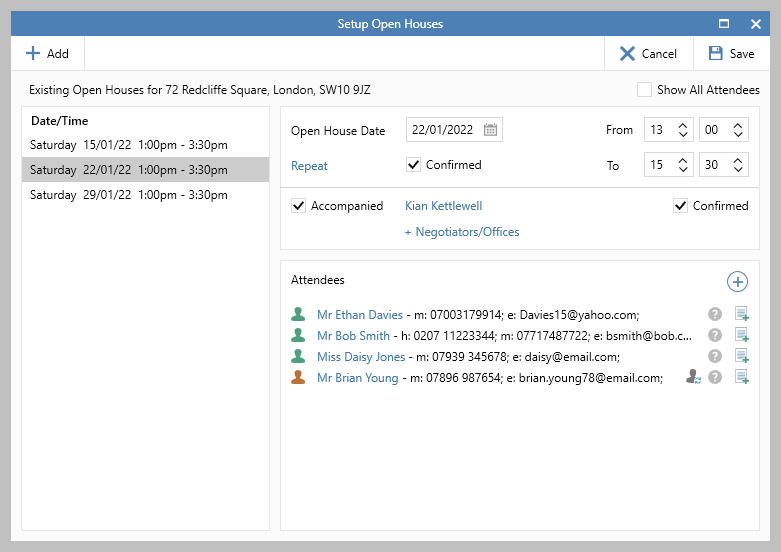 Image Removed
From Date/Time column on left, select the relevant appointment In the Attendees panel, click  button button
Search for the applicant or contact (ensure Include Contacts is ticked on search screen), click Add if not found
|
Right- right-clicking the Add button displays the most recently accessed applicant records When found, double-click the required applicant/contact to add them to the Attendees list Repeat until all attendees are added
Image Added| Tip |
|---|
The appointment will be added to the property and applicant journals (or contact journal, where configured) - the appointment is added to the Viewings section as an Open House Viewing An appointment can be deleted if no attendees have been added
Select the appointment in the left hand panel and press Delete on your keyboard Hovering over an applicant/contact name displays a summary of their details |
|
5. Attendee roles Different icons are displayed in the Attendees panel to indicate the role of each attendee listed |
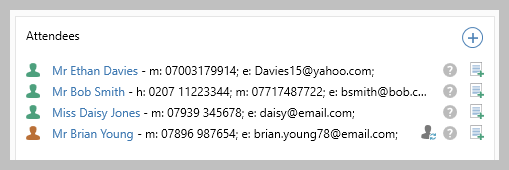 Image Removed
Green icon indicates this person has an applicant role Orange icon indicates this person has a contact role
If you need to create an applicant record for a contact, click the icon shown to the immediate right of their name
Image Added |
6. Log interest An option to log an interest level is available to the right of each attendee name |
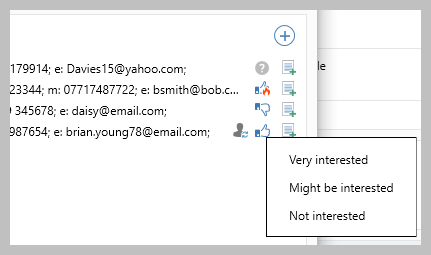 Image Removed
 | 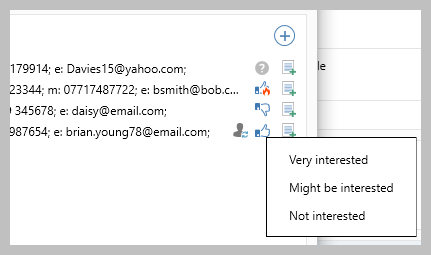 Image Added Image Added
|
7. Log feedback Viewing feedback/follow-up notes can be logged Click the icon to the far right of the attendee name
A Notes screen is displayed
Enter feedback and close to save
The icon will change to indicate follow-up notes have been added
Hovering over the icon will display the notes for quick reference
|  Image Modified Image Modified| Info |
|---|
Follow-up notes are added to the viewing in the applicant/contact and property journals |
|
8. Removing an attendee |
 Image Removed
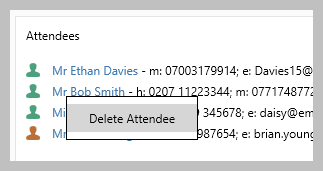 Image Added Image Added |
Related articles
| Filter by label (Content by label) |
|---|
| showLabels | false |
|---|
| max | 58 |
|---|
| spaces | com.atlassian.confluence.content.render.xhtml.model.resource.identifiers.SpaceResourceIdentifier@a45 |
|---|
| sort | modified |
|---|
| showSpace | false |
|---|
| reverse | true |
|---|
| type | page |
|---|
| cql | label = "viewing" and type = "page" and space = "RW" |
|---|
| labels | viewing diary |
|---|
|
| Note |
|---|
Need more assistance? No problem! Just log a ticket on the Reapit Service Desk Portal at https://reapitsupport.refined.site/ and a member of our Support Team will be happy to help |
| Excerpt |
|---|
|
Using the Open House / Open for Inspection (OFI) function in AgencyCloud |
